
Recently, I’ve wanted to be able to VPN into my home network so that I can perform various tasks while out of the house. My provider does not offer static IP addresses to residential customers, so I have to rely on a Dynamic DNS service. I don’t want to have my personal IP publicly listed on my domain, however, so I’d like to use Cloudflare to proxy the IP.
Asuswrt-merlin (developed by Eric Sauvageau – well worth a look if you are currently running the stock asuswrt firmware) provides the ability to link the router up to a Dynamic DNS service (DDNS).
However, it does not natively support Cloudflare as a DDNS. In fact, Cloudfare doesn’t appear to have a dedicated DDNS system (certainly not on the free tier). But, with some clever trickery (produced by others), its possible to set it up to update DNS records in cloudfare.
None of this is my handiwork, but for posterity, I want to document the full process to set it up here.
What do you need?
- A Cloudflare account
- A USB Stick
- An Asus router running asuswrt-merlin version 384.7 or above
Step One: Cloudfare Setup
The first thing you are going to need, is a cloudfare DNS record, and an API key, so that your router can update the record. Follow the guide to create a new API key, when selecting permissions, give the key access to edit the DNS zones for your target domain.
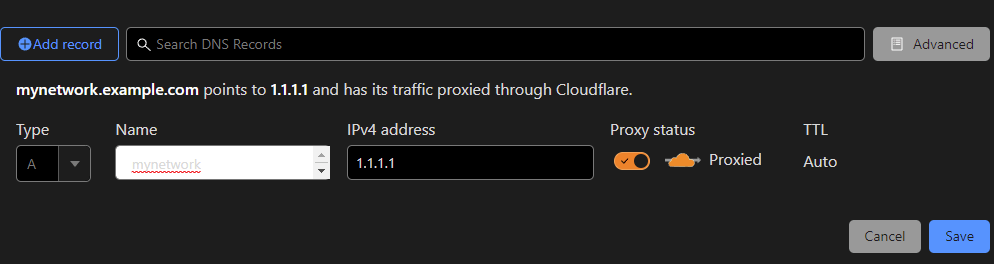
Once you have completed that, go to the DNS section for your domain, and add a new A record. You can call this whatever you like. For now, just set it to any IP address (such as 1.1.1.1) – we’ll be changing it automatically soon.
Set the following settings:
| Setting | Value |
| Type | A |
| Name | Whatever your subdomain for the home network should be, in this example, its mynetwork |
| IPv4 Address | For now, just set it to any IP address (such as 1.1.1.1) – we’ll be changing it automatically soon. |
| Proxy Status | You’ll want to set the Proxy flag to on, in order to benefit from hiding this IP address from the world. |
Step Two: Router Preparation
Because asuswrt does not support Cloudflare as a listed DDNS service, we’re going to need to set the router up to run a custom script. Before we do that though, we’re going to need to get the router ready, with all the required software. In this section, I’ll assume you’re running stock asuswrt-merlin, and haven’t done any customisation yet.
SSH Configuration
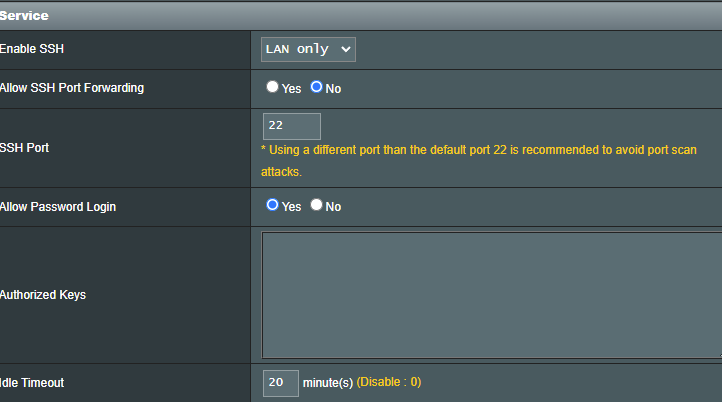
First, we’re going to allow ssh login on the terminal, so we can access the router via CLI. Log into your routers web interface (by default this should be 192.168.1.1).
Navigate to Administration > System, and enable SSH. I would recommend only doing it for LAN only, so that outside attackers are unable to get into it. You’ll also want to allow password login (or set up some authorised keys). Hit the Apply button to commit those changes.
JFFS Configuration
Next, we need to ensure that JFFS2 is configured on the router. Set Enable JFFS custom scripts and configs to Yes.

Finally, plug a USB stick into the router. We’re going to format this and leave it permanently in place, so be sure you’ve taken all the data off it first.
Step 3: Router Setup
Now that we’ve got ssh set up, we’re going to log into the box. Open up a terminal, and use ssh [loginUser]@[routerIP] Where loginUser is the username you log into the webUI with, and routerIP is the IP address of the router. Enter the password, and you’ll be presented with the session prompt.

Asus Merlin has a fairly powerful terminal menu that simplifies a lot of tasks, we’re going to use it here to get a few things set up. Type amtm to load the menu up.

Formatting the USB Stick
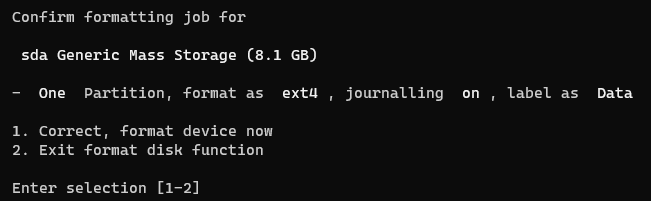
First, type in the fd command. This will prompt you for various decisions relating to formatting the USB drive you just plugged in. Unless you explicitly want something different, you can use the recommended settings for most of them.
You get a chance to confirm your choices just before it executes. If you are unhappy with any of your choices (or have forgotten to take the data off), you can use this chance to correct any issues. Once you confirm here, everything on the disk will be wiped out.
Once this completes (it can take a bit depending on the size of the drive you plugged in). It’ll take you back to the main menu.
Required Package Setup
If you enter i, it will show you all the packages you can install via amtm, I won’t go into details about these, but the one we want is Entware. Type in ep and hit enter to install this package. Once this is done, hit e to exit the amtm menu.
Back at the ssh prompt, we’re going to install python. Type in opkg install python3 – This should prompt Entware to install the python packages.
Script Setup
Ok, now we’ve got everything set up and ready, we need to configure the router to update the DNS settings. Thankfully, others have forged this path before, so we just need to grab the required script.
Download the ddns-start script from this repository. The easiest method is to navigate to the raw file, then right-click and select Save As. Once you have it, you’re going to want to open the file, and update it with the relevant settings, as described on the repository’s README.
Copy the file
Once we have the file, and updated the settings, we’re going to copy it to the router.
There’s a few options for doing this, but I’m going to use scp for this. From a standard terminal prompt (not your ssh session), type in scp [path to local file] [loginUser]@[routerIP]:/jffs/scripts/ddns-start – you’ll be prompted to enter your ssh credentials again.

NB: Windows tends to download the file as a .txt file – When copying the file over, remove the extension. For this to work, the file name needs to be exactly ddns-start
Once this completes, ssh back into the box, and check the file is present
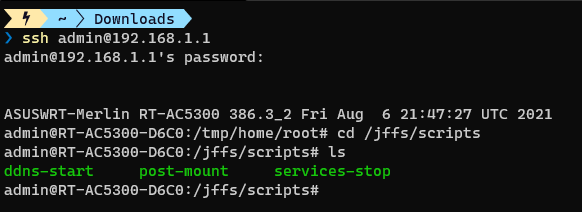
Next, lets make sure the file is executable by the system, using chmod +x /jffs/scripts/ddns-start.

You can manually execute this script using ./jffs/scripts/ddns-start – If everything goes well, it should just return to the command prompt without error.

You can verify the script worked successfully, by returning to the Cloudflare dashboard DNS settings, and checking the IP has changed from the original value to your current IP. If you don’t know what that is, use WhatIsMyIPAddress to check.
Final Step: Configure DDNS
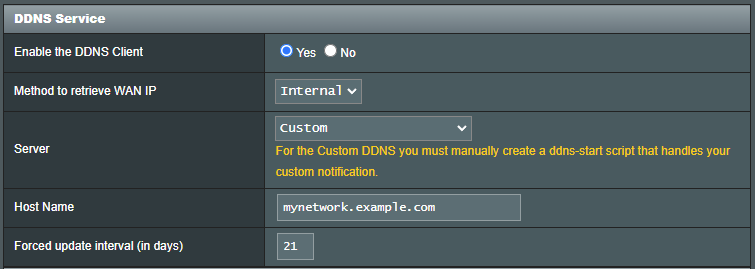
Log back into the router webUI, and navigate to WAN > DDNS. Here, we should set the following values:
| Setting | Value |
| Enable the DDNS Client | Yes |
| Method to retrieve WAN IP | Internal |
| Server | Custom |
| Host Name | The subdomain we set up in Cloudflare (in the case above, its mynetwork.example.com) |
| Forced update interval (in days) | 21 |
Once you have configured this, hit Apply to save the changes.
Conclusion
Now you should have a cloudflare DNS record that hides your home IP address, and updates automatically whenever the WAN IP of the router changes. From here, you can add additional DNS records that point to this A record (such as vpn.example.com for your VPN traffic). This will allow you multiple subdomains for whatever you need, all driven from a single record that is updated by your router.
